Organic gardener growing food and flowers, lovin' pollinators and birds.

Floral Friday: Aug. 25

This week I'm trying not to think about the approaching autumn. (As you know, I am not a fan of shorter days.) In America, we experienced a solar eclipse on Monday, and although my area didn't have a view of the sun being entirely covered, it was still pretty awesome to see (safely, of course). I also released two monarch butterflies that day, which made it even more unique! 

As for the flowers, in the front garden the phlox are in the final stages of their show, after performing heavily throughout August. I've been trying to keep up with deadheading all flowers, but it takes a lot of time to do, and honestly it hasn't been a priority. But overall, the garden looks healthy and alive. 

Here are some highlights from this week in the garden:


My mandevilla vine (above) is blooming constantly. It is right near the hummingbird feeder. I have limited myself to one feeder this year in efforts to keep up with replenishing the food. Also by the front door are the two giant Hollywood Hibiscus* plants from J. Berry Nursery, which I was lucky enough to sample this summer. This is my third year growing plants for J. Berry, and each year they seem to perform better in my Zone 6 garden. Below is 'Hot Shot' (red) and 'First to Flirt' in my giant blue ceramic planters. They are paired with euphorbia and dichondra. (To see what they looked like earlier in the season, click here.)


Keeping up with the red and orange theme, I love how reliable the Proven Winners 'Vermillionaire' cuphea is in attracting hummingbirds!** It is doing very well in the container in the front garden near the bird bath.


As I mentioned earlier, I've begun releasing monarch butterflies that I have raised from caterpillars. Here is one female butterfly that I released earlier this week. I named her Diana, and she came out of her chrysalis on Monday during the solar eclipse. The joe pye weed has been a hit not only with the butterflies but all the bumblebees as well.


Continuing the tour of the front garden ... my large perennial hibiscus plants are beginning to bloom.


Over to the vegetable side is an update on the tomato plants I'm growing from Burpee.*** Below is 'Oh Happy Day' and 'Gladiator.' I can't wait til they ripen! (The 'Gladiator' variety had some tomatoes already ripen but it was while I was in California, so my neighbor was able to enjoy them instead!)


The Kieffer pears are getting close to harvest, and I'm trying to figure out ways to deter the squirrels from ravaging them as they did the plums in July.


I know it happens to everyone, but this grape plant was supposed to produce a white grape. It's definitely a purple. And not sweet. And I have no idea how to make wine. Time to learn, I suppose!


In the back garden, I was delighted to find this huge garden spider! (My husband was not so happy. He's not a fan of spiders in general, but I let him know which area of the garden to avoid.) I hope he (she?) eats many, many mosquitoes!


And closing out the tour this week is my Garden Blogger Fling inspired container. The coleus I planted with the various hostas and elephant ears have really taken off! And of course, it had to include the dichondra, my new favorite trailing plant. (In the background, Virginia creeper scales the fence.)

What's growing and blooming in your garden this week?


* J. Berry Nursery provided me with sample Hollywood Hibiscus plants to try out this growing season. 

** Proven Winners provided me with sample plants to try out this growing season. The cuphea is one of the sample annuals.

*** I was part of the Burpee sampling program this summer and was provided with plants to grow. I will be filling out a survey soon on how they performed in my garden.
SHARE:

Subscribe to Garden Design and get first issue free — on me!

I have always admired the photography in Garden Design magazine because I always get so many ideas for plants and designs that I want to add and try out in my garden. Each season I'd stalk the area bookstores to try and get the latest issue, but this past summer, I started having trouble finding it in my area. 

One time the bookstore clerk even tried to sell me a different garden design-themed magazine, and I told her it wasn't the same — at all.

So when my friend Emily at Pass the Pistil was offering a subscription offer that included getting the first issue free, I decided it was time to sign up to receive Garden Design at home — no more trips running around to bookstores trying to find it! Talk about great timing!

Now I'm excited to be able to offer my blog readers the same offer! If you are  not yet a subscriber to Garden Design yet, the summer issue is a great one to start off with. My friends get their first issue free when they subscribe! Go online to https://www.gardendesign.com/2017  or call (855) 624-5110 Monday – Friday, 8 a.m.– 5 p.m. PST and mention this offer.


Photo by GAP Photos/Friedrich Strauss (courtesy of Garden Design).
Photo by Jonathan Buckley
(courtesy of Garden Design).


The best part? Garden Design ships so quickly and arrives in a padded envelope to protect it through mailing. Garden Design offers full-length stories (some run 10 to 20 pages to include lots of gorgeous photography) on plants, gardens, and design ideas for you to put to use—all presented without ads.

That's right. NO ADS. 

What will you find in the summer issue? Here's a glimpse of two photos included in the summer issue.

A feature on hydrangeas! Hydrangea arborescens 'Annabelle' is beloved for good reason. Its huge white flower heads—8 to 12 inches across—grace shrubs for 2 months in summer. Zones 3-9. 

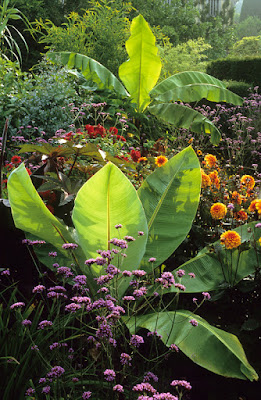
An article on growing bananas, Banana-Rama. You don’t have to live in a tropical climate to have a tropical look, as the photo at right shows!

So if you'd also enjoy garden inspiration delivered at your doorstep, feel free to use the subscription link above. Or if you call, tell them Frau Zinnie sent you. You'll receive five issues for the price of four.


SHARE:

Eco Garden harvest has me saving green

Sponsored post: This post is sponsored by Eco Garden Systems LLC, but the content and opinions expressed here are my own. Eco Garden Systems LLC provided me with an original Eco Garden System for review purposes.

I've been able to save $45 within a month at the grocery store. It wasn't due to coupons or store gimmicks. It was because I've been growing my own celery in my Eco Garden System, a self-watering raised bed.

The celery has gone to feed my two pets, Max and Jack. They are celery connoisseurs, who prefer organic celery ... which means they refuse to eat non-organic celery. (Max and Jack are my spoiled indoor house rabbits.)

I’ve been treating the celery as "cut and come again" — as one would do with lettuce — which has provided me with a continuous supply for my hungry rabbits. The trick to growing successful celery is providing consistent moisture, since celery is a heavy feeder and likes to be wet. If celery is not wet, its stalks will be dry and small.

That's not the case with my celery! The celery stalks are huge! At one point I had a very nice looking bouquet of celery that I considered putting in a vase and admiring instead of feeding to my little beasts (see the photo above). It's been easy to grow the celery without worrying about if it gets a constant supply of water because I know the water reservoir at the bottom of the Eco Garden System helps to keep the plants' roots happy.

In fact, if there is too much water in the reservoir, there's a way for it to drain so the plants are not at risk for drowning. The water can escape through an overflow valve (shown at right) or through a spout, which can be used to empty the water from garden at the end of the season.

As for regular watering, I have only hooked up the unit about five times to my garden hose so far this summer. Why not more? I believe it's due to a combination of the unit collecting rain water and storing it in the water reserve underneath the plants, as well as the unit doing a remarkably good job of keeping the soil moist. We’ve had some very hot days in July, and while the rest of the yard has been wilting in the heat, the Eco Garden has held up really well, mainly due to the water it conserves. (A bonus considering that it sits on top of black pavement in my driveway, which also gives off heat!) Even though the unit does a great job of keeping the soil moist, and can distribute the water through the tubing and sprinkler heads, water in my area is a bit expensive, so if I don't have to water, then I'm a happy person.

Thanks to the size of the Eco Garden System (50 inches wide by 74 inches long), I was able to plant a wide variety of plants in a spot that I was unable to use before (my driveway). That means food for me and for my pets! I decided to follow companion planting practices when I planted my edibles back in June. Here are some highlights of what I grew so far this summer:


Lettuce (from plant starts): In my original post, I shared some photos of very good-looking heads of lettuce (also seen above before I harvested them). When I harvested my lettuce there was a sizable gap left, so I planted a 'Goose Egg' eggplant I got on sale at my organic gardening center. I also planted the seedlings I started in June of Mexican sour gherkin plants (from Hudson Valley Seeds), which will take 75 days to reach maturity.  In mid-July, I also decided to add marigold seeds ('Lemon Drop' a French marigold from Botanical Interests that will grow 5 to 8 inches tall); and cucumber seeds ('Bush Slicer' from Renee's Garden) which has a estimated 55 days to harvest.

Mexican sour gherkin plants (left) and eggplant and cucumber plants (right) benefit from the self-watering featuring in the Eco Garden System.
Bush beans (from seed): I decided to grow 'Red Swan Beans' from Hudson Valley Seed Library. I was able to insert short garden trellises into the Eco Garden that helped support the bush beans, but were not so large that it would puncture the water barrier that separates the soil from the water reservoir.


The bush beans grew quickly and I was able to start harvesting them at the end of July.


Carrots (from seed): I chose to sow 'Short Stuff' Chantenay Carrots from Renee's Garden, a variety that will take almost 75 days to mature, and as I've been thinning the crop I've gotten a peak of what's below the surface. So far I have tiny carrots that are about halfway into their life cycle.

Kale (from seed) and herbs (from plant starts): The kale I grew from seed grew so fast that I had a hard time keeping up with thinning it. The small parsley transplants have increased in size as well. Both were planted near the carrots in the Eco Garden System.

So, what’s next? It’s time to plant for fall! As I've been harvesting celery and kale, I once again have gaps in my Eco Garden System, so I'm planning to replant my raised bed for a fall crop, which means choosing varieties that mature quickly (55 days or less). As the length of daylight shortens, I will most likely include lettuce in my fall gardening plans.

Want to read more about the Eco Garden System? Read my first post on setting up the unit, or watch the short video below.


SHARE:

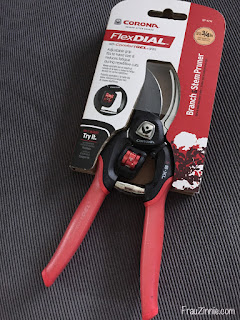
Product review: Corona FlexDIAL ComfortGEL Bypass Pruner


For the past month, I’ve been trying out the Corona FlexDIAL ComfortGEL Bypass Pruner* since it arrived in my Garden Bloggers Fling swag bag. Previously, I have relied on an older, non-brand name pruner that was handed down to me when we bought our first home in 2009. Needless to say, I was very excited to have a brand new pruner to try out for my gardening chores.

This pruner offers a FlexDIAL, which adjusts the grip of the handles depending on a person’s hand size. Because this pruner is adjustable, it is supposed to reduce fatigue during repetitive cuts. There are eight positions that the pruner can be set to and the pruner can cut branches up to ¾ inch thick. The pruner’s blades are made from non-stick non carbon steel, with a full steel core.

I’ve given it quite the workout. First, I used it to trim spent blossoms and older branches on my lilacs. I used it to prune water spouts off my pear tree. I also use it for less arduous tasks, such as deadheading my perennials. Depending on my chore, I found myself changing the dial. For faster cuts, I moved the dial to the first setting. For the thicker lilac branches, I adjusted the dial up to 7. The cuts are clean, as shown in the photo below.

A nice clean cut on this lilac branch.

What I like best about this pruner is that the blades do not stick when I use them (which is something that was a major issue with my older pruners). In the past, if I tried to cut a large branch, the blades would end up catching portions of the branch and get jammed. (Even sharpening the blades didn’t do the trick.) I now find myself reaching for these pruners when I head outside, and since they can cut fairly large branches, I don’t need to lug around a heavy pair of loppers with me.

The FlexDIAL ComfortGEL Bypass Pruner retails for $35.53 on the Corona Tools website.

* I received a complimentary Corona FlexDIAL® ComfortGEL® Bypass Pruner while attending the Garden Bloggers Fling 2017.


SHARE:

Recipe: Shiro Plum Coffee Cake


I love when it is time to harvest the Shiro plums in the garden. This year, I really had to dodge the wildlife, who also discovered how delicious these small, yellow stone fruits are. They have a slightly tart flavor which develops as they bake, which makes for an excellent jam or pastry. This time I decided that I wanted a faster result then jam, so I opted to make a fruit-topped crumb coffee cake.

What you'll need:

Plums:
3 cups of Shiro plums, cut up with pits removed
(Keep the excess juice with the plums, but set 3 tsp. aside.)
1 tsp. lemon juice
1 tsp. vanilla extract

Cake:
1 ½ ounces of butter
½ cup granulated sugar
1 egg
1 tsp vanilla extract
½ cup skim milk
1 ½ cups AP flour
2 ½ tsp baking powder
½ tsp Himalayan pink salt

Crumb topping:
1 ¼ cup flour
1 stick of butter (4 ounces)
½ cup granulated sugar

Mixer
9 inch cake pan (a spring form pan would make it easier to remove the cake)
Parchment paper
Pan spray
Powdered sugar
Sifter

Directions:

For the crumb topping, melt the butter and add it to the flour and sugar. You can mix it by hand or with a fork. You’ll want large coffee cake crumbs. Set aside.

Combine the lemon juice with the Shiro plums. Set aside.


Using a mixer, cream the butter and sugar together, scraping down the sides periodically. Add the egg and vanilla. Scrape the sides of the mixing bowl to make sure the ingredients are incorporated well.

Slowly add the skim milk, scraping down the sides afterwards.

Add the flour, baking powder, salt to the mixer, being careful not to over mix. When the flour is almost incorporated, add 3 tsp Shiro plum juice. Do not over mix.

Spray the cake pan, and then place the parchment paper down. Spray it again.


Pour the cake batter into the pan.
Now add the plum mixture at the top, weaving in the fruit and juice with the spatula.


Place the crumb topping on top so it completely covers the fruit and cake batter.


Bake at 350 degrees and begin checking at 40 min.
The cake is done when a toothpick inserted in the middle comes out clean.


Garnish with powdered sugar sifted on top!


Note: When I first created this recipe, I used an 8 inch cake pan to bake my cake,
which meant it had to remain in the oven longer for all the Shiro plum fruit and juice to bake in. 
Changing the recipe to a 9 inch cake pan should shorten the baking time.

I'd love to know if you make it, too!
This recipe can be customized with a different type of plum variety as well.

SHARE:

Floral Friday: Aug. 4

The garden centers are filled with echinaceas, and I couldn't resist adding some to my garden. Here's Echinacea 'Sombrero Granada Gold', with flowers that look like they could be buttons on a little girl's dress. I love how the petals are a hue of creamy butter. By the way, have you listened to Echinacea Evolution yet over on the Still Growing podcast?


For the past year I've been collecting blue wine bottles, and I finally accumulated enough to build a bottle tree for the front garden. (I allowed some non-blue bottles on as well.)


My containers are really popping right now with color, offset with the black eye Susans behind them. In addition to blue wine bottles, I've been collecting cobalt blue pottery for almost five years now. (I like to buy them at discount stores.) Last year I scored a large blue birdbath as well!


Speaking of large pottery pieces, I also bought this one last year (below) but moved it under the pear tree for this season. I saw this plant combination at a nearby eatery and totally fell in love with it. I was lucky to be able to acquire the same plants to use in my garden. Their version was in a whiskey barrel, but I think the blue pot really makes the trailing plant combos pop.


I found this adorable birdhouse at the grocery store and of course it had to come home with me. 


Continuing the tour of the front garden brings us to daylilies...


... and roses ...


... and of course, phlox. Here's 'David,' among his many pink variation friends.


Above the phlox is the Satsuma plum tree. I love the colors of the fruit, and the phlox makes a beautiful bokeh in the below photos.


Going along with the purple edibles theme are my purple bush beans, growing in my Eco Garden System.


I'm really looking forward to trying these 'Gladiator' tomatoes from Burpee!* I was lucky enough to be part of the sample plants program this year. I can't wait to see how they taste!


I found this "intruder" on my parsley. I brought him inside to raise with the other caterpillars.


I wanted to end with a view from the border of my neighbor's garden of her black eye Susans and asparagus. Isn't it a pretty combination?


What's blooming in your garden this week?

* I was part of the Burpee sampling program this summer and was provided with plants to grow. I will be filling out a survey soon on how they performed in my garden.

SHARE:
Blogger Template by pipdig